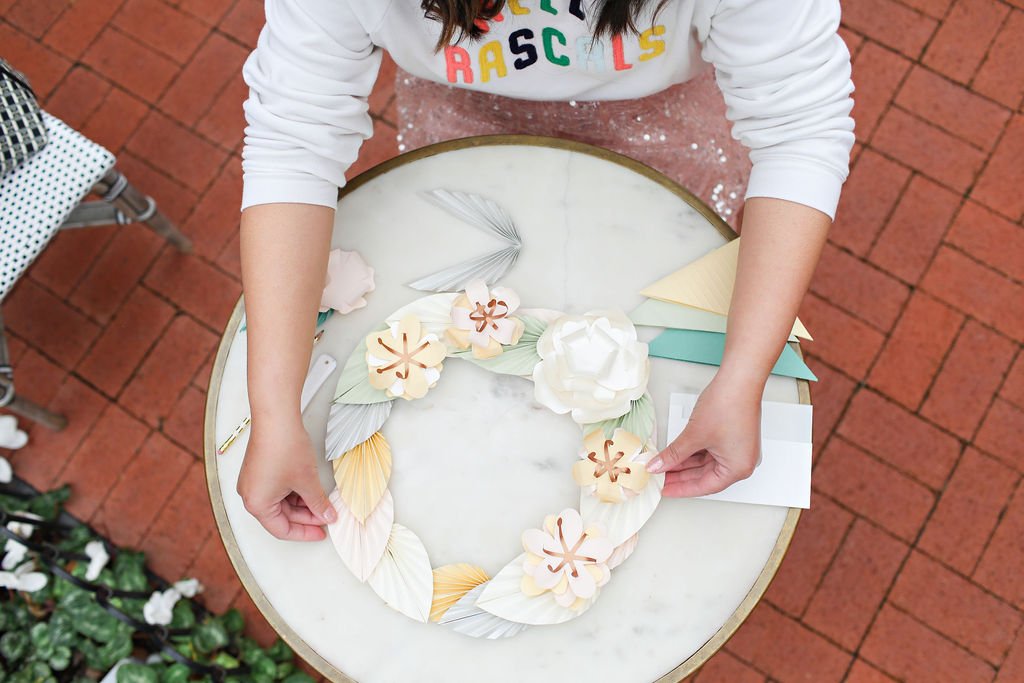
Mother's Day Flowers

Mother’s Day is a special day to show your mom how much she means to you. While there are many gifts that you can buy for her, nothing says “I love you” more than something made with love and care.

Creating flower arrangements for mom using store bought flowers is a thoughtful and easy way to show your appreciation this Mother’s Day. With just a few supplies and some creativity, you can create beautiful bouquets that are sure to make your mom feel loved and appreciated. With this guide from Better Home & Gardens, you will learn how to make the perfect flower arrangement for Mom that she will cherish forever!

Step 1: Decide on a flower arrangement design.

One way to guide your arrangement is to decide on a color scheme before shopping for flowers. Then, when you go to buy flowers, you know you're picking up colors that work well together. Monochromatic schemes, which show off the variety of different hues of the same color, can be striking. For another high-impact floral design, try complementary colors that will pop against each other.

Step 2: Cut and prepare flowers.

After arriving home with your flowers, you might be tempted to begin arranging right away. However, there are some important steps to take to prepare flowers and make them last longer. First, remove extra leaves and damaged petals from stems. If there are unwanted buds on the same stem as a full flower, cut those off as well. Once the stems are cleaned up, make a fresh diagonal cut to the bottom of the stems. Put the trimmed stems into a vase or bucket of water (this doesn't have to be your final vessel) with cut flower food.

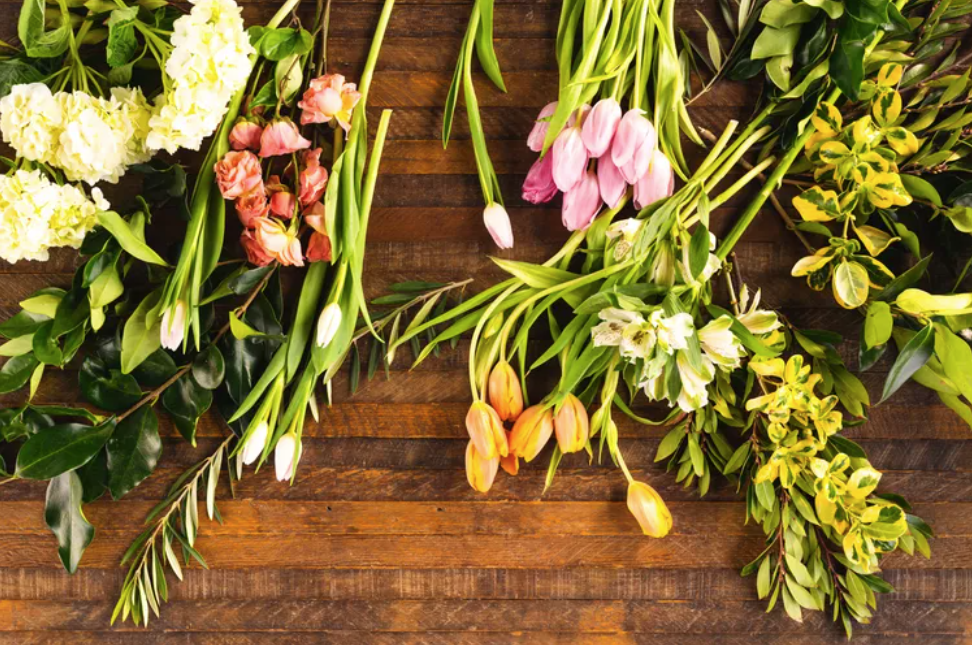
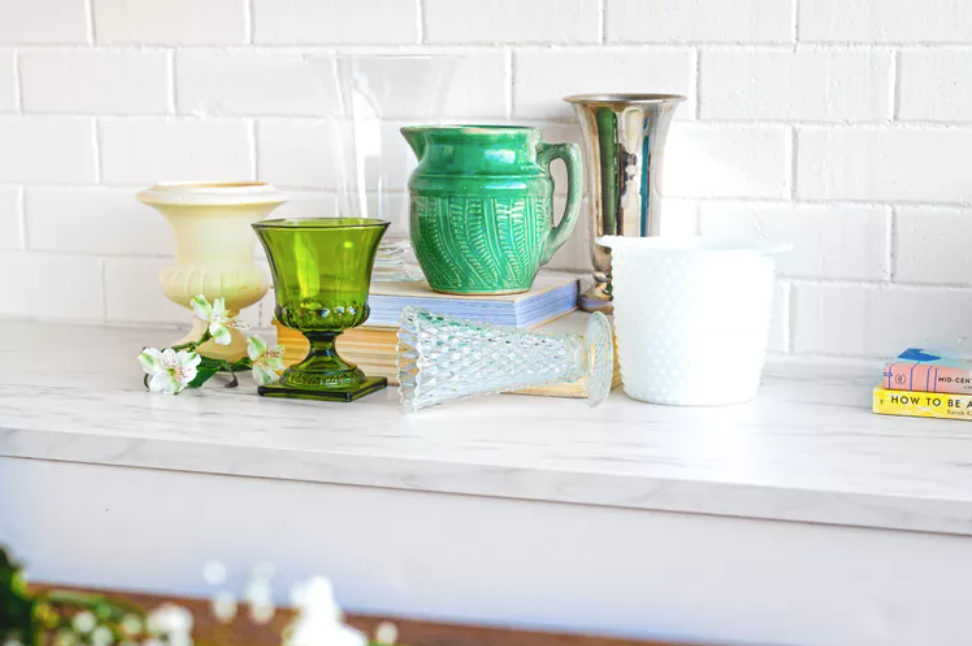
Step 3: Choose a vessel.

When selecting a vase or other container for your arrangement, consider the type of flowers you're using. Tulips typically require the support of a straight-sided vase, for example, while tall branches or top-heavy flowers might need a weighted vessel. Apart from traditional vases, we likes to house flower arrangements in woven baskets for added natural texture. To hold water and keep the flowers in place, line the basket with a plastic container (shop your kitchen cabinets or repurpose plastic water bottles and other packaging). If necessary, fill in with moss around the container to disguise the plastic inside the basket.

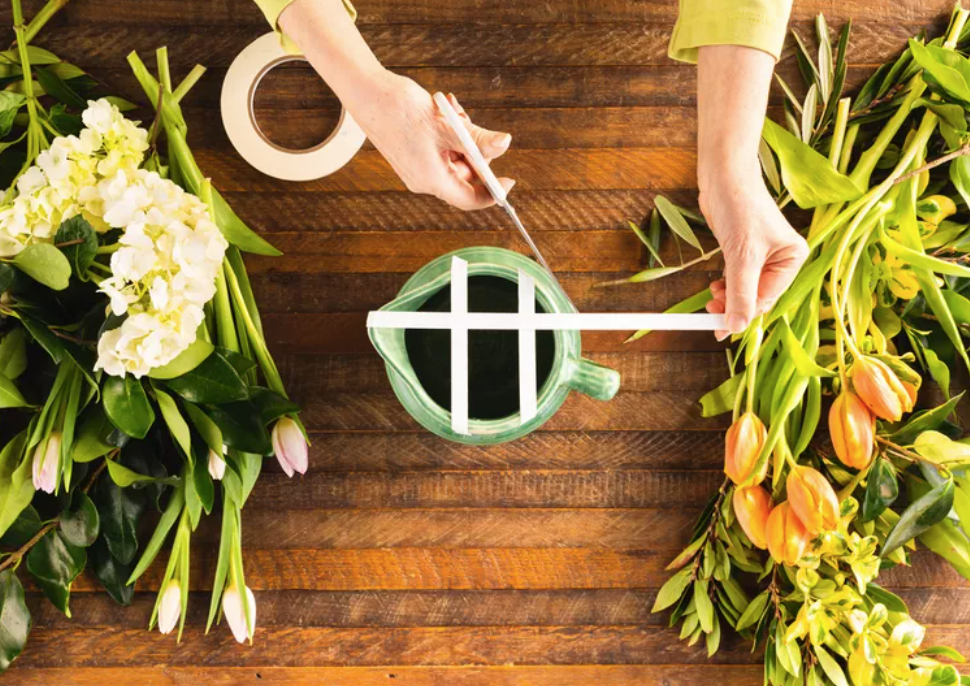
Step 4: Prepare your flower vase.

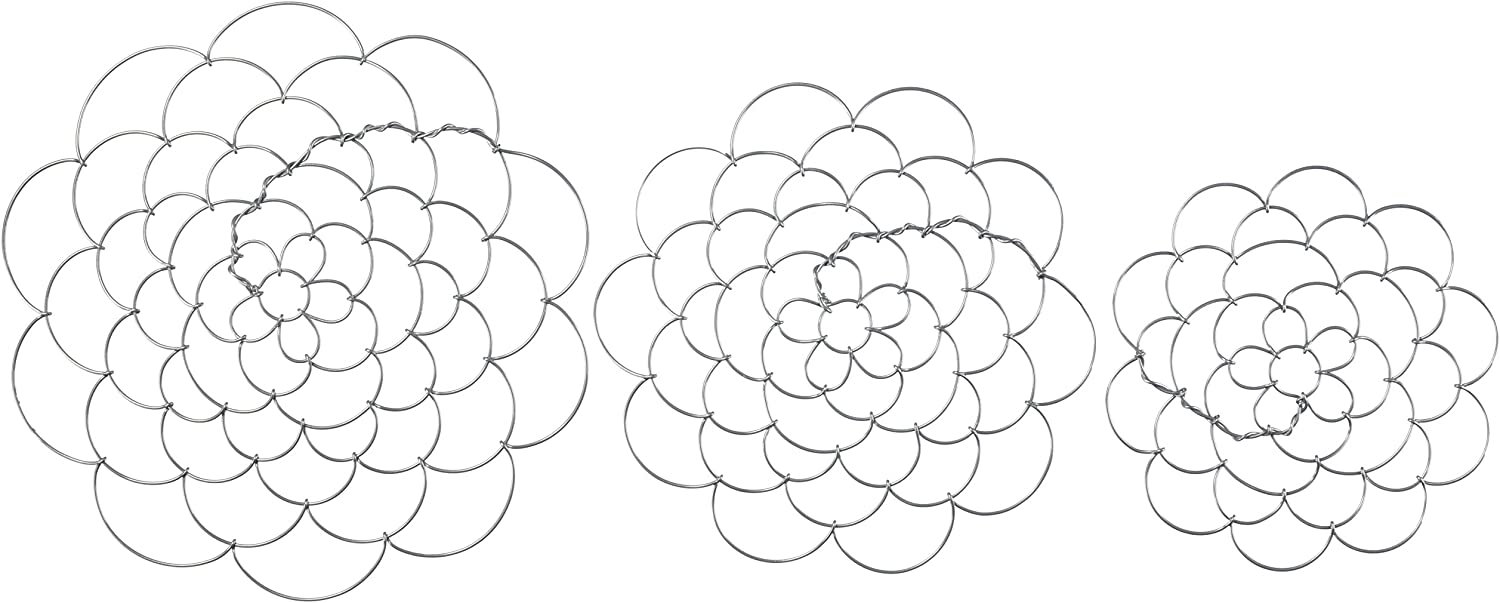
The most important flower arrangement technique doesn't actually involve the flowers—it's all about the vessel you put them in. If the flowers don't have a sturdy foundation, they won't stay in place and your arrangement will end up falling apart. To make sure flowers stay in place, create a grid of floral tape over the mouth of the vase. Stick the stems through the holes of the grid to keep them in place. You can also purchase a floral frog, which is a vessel insert with pins for stems to be stuck into. You can even DIY a floral frog with a small section of chicken wire bent into a ball.

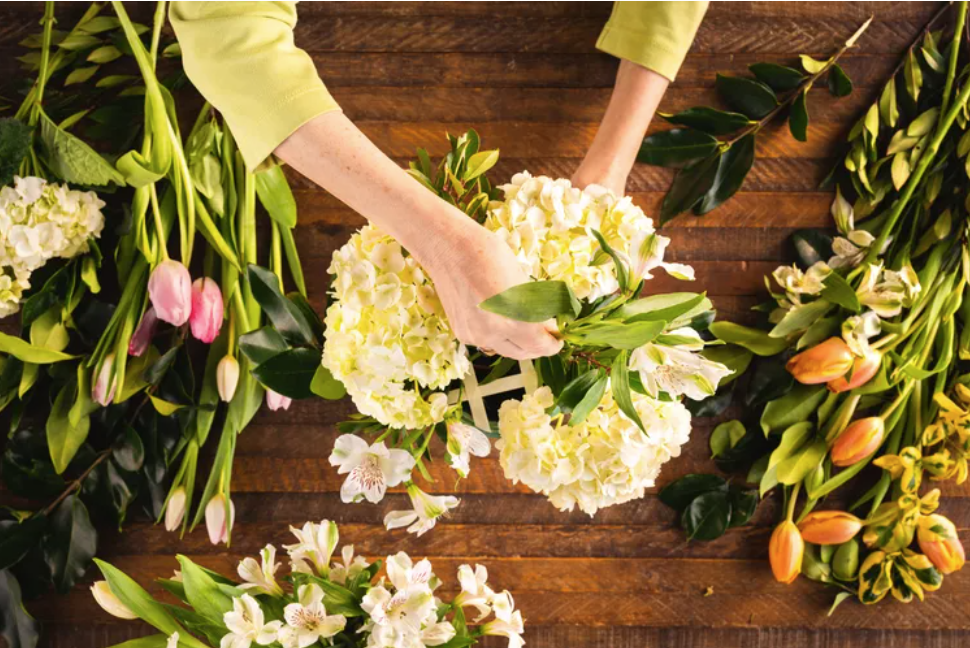
Step 5: Create a base with greenery.

The best way to arrange flowers is to start with greenery as a base. Eucalyptus, ivy, and fern fronds are good greenery go-tos. Use the stems of the greenery to create an inverted triangular shape. This guarantees your arrangement will have both a horizontal and a vertical presence. Also, be sure to recut stems before adding them to the vase.

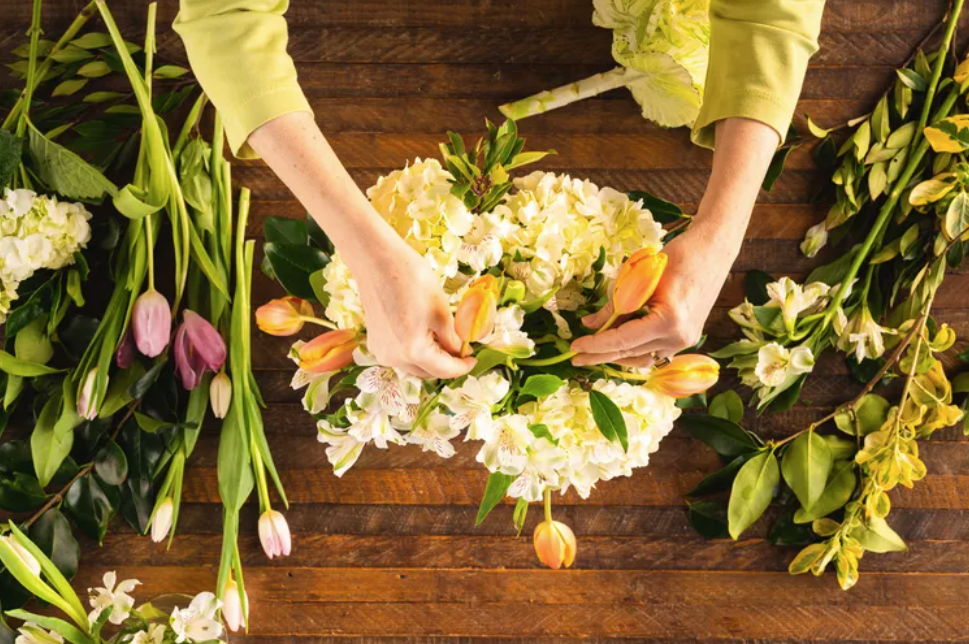
Step 6: Add focal flowers.

Focal flowers are usually the largest blooms or those with an unusual color or texture. Make sure to add in odd numbers for a more natural (not symmetrical) look. Don't place the focal flowers so they are sticking straight out on the sides: they will look droopy and heavy, rather than strong and perky.

Step 7: Add filler flowers.

Add smaller flowers and textural elements in the arrangement to fill around the focal flowers. Again, don't place all of the supporting flowers straight up or to the sides. You can think of the shape of the arrangement as a dome, and you need to fill in all angles of that dome for it to look complete. Combine smaller flowers in groups of three or five to create clustering, similar to what happens in nature.

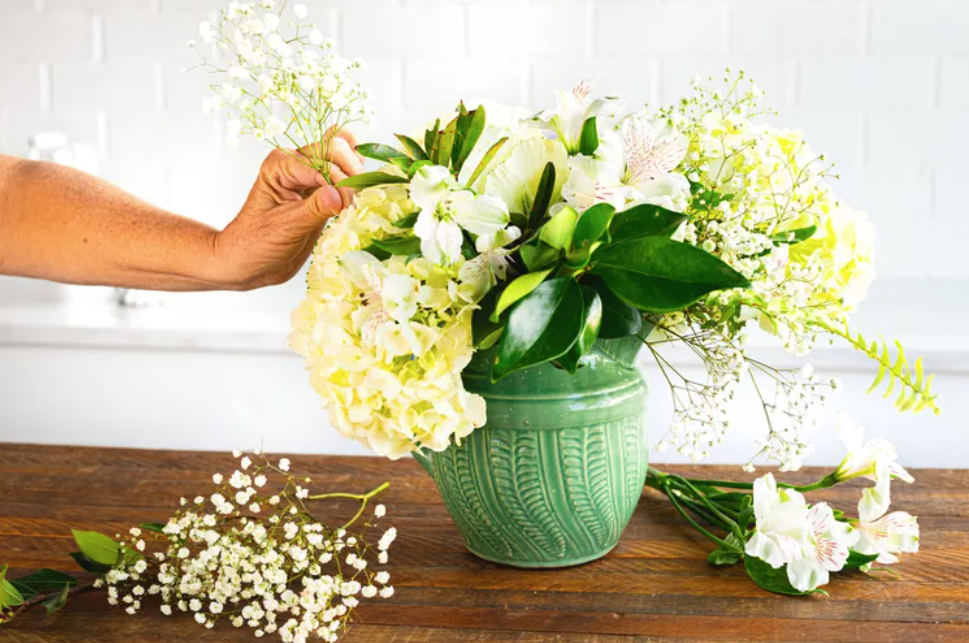
Step 8: Finish your flower arrangement.

Finish the design with floaters or delicate blooms like baby's breath, sedum, or yarrow. Put these in last so they don't get squished or buried by heavier blooms. Before displaying, give your finished flower arrangement a light spritz of water to mimic the look of fresh dew. Refill the vase with water as needed to keep the flowers hydrated and fresh.

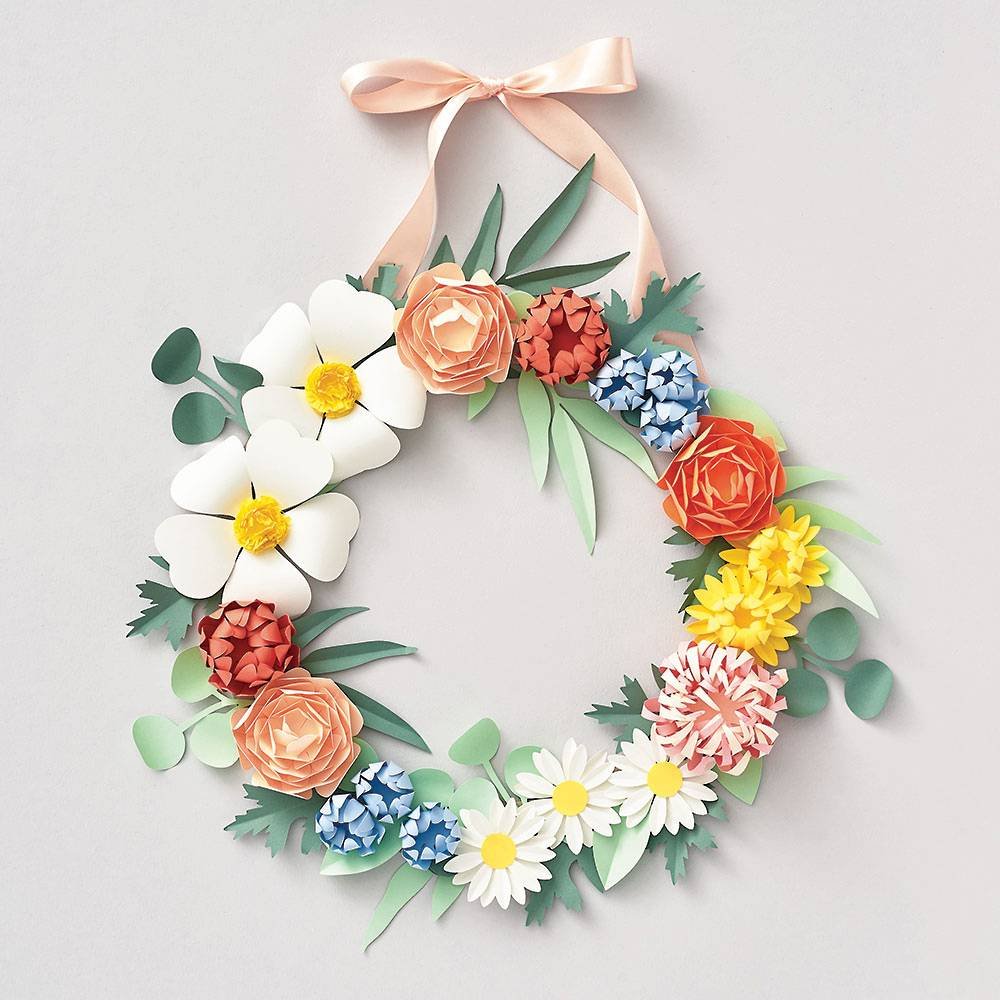
It’s easy to make your own flower arrangement and personalize it for the mother figure in your life. We hope you can use this idea to create something special this Mother’s Day.

Written by Head Rascal (Ngoc Nguyen Lay), mother of two rascals, ages 8 and 10. Shared from Better Homes & Garden.


Shop this Post

Paper Wreath

I love the way my home looks during the wintertime. It’s always decorated for the holidays and gives guests a peek into my style and personality. My favorite holiday decorations are wreaths. They add so much color and life to our homes, even during the coldest months, so I figured, why not freshen up our home with a Spring wreath too? You can decorate your home no matter the season and express yourself in a really beautiful way throughout the year. I used Paper Source wreath kits to give a bit of Spring to our door. They have a full collection of wreaths for every season.

Written by Head Rascal (Ngoc Nguyen Lay), mother of two rascals, ages 8 and 10. Photos by Adrienne Gunde Photography. Sponsored by Paper Source.


Shop this Post

Bird Feeders

During the springtime, all I want to do with my boys is spend time outside. However, it doesn’t take long before my rascals’ attention ends up elsewhere and they want to move on to the next thing. That’s why I try to help them feel a connection with nature wherever I can, and making DIY bird feeders is the perfect way to get them involved, do an earth-friendly activity together, and, hopefully, teach them a couple things along the way.

The best thing about this project is everything you need is either a staple or is easy to come by! It’s also pretty impossible to mess up and it’s fully natural, so you don’t have to worry about any harm coming to the earth or any animals.

Supplies Needed:

  • Pine cone(s)

  • Peanut butter (the thicker the better)

  • Twine

  • Bird seed (I like this wild bird seed)

Instructions:

  1. The first thing you’ll want to do is go for a walk with your rascal(s) to your favorite local park and collect pine cones! There are pine cones everywhere in the parks near my house, so it’s never hard for my rascals to find a few they like. The best ones for this bird feeder are ones that have dried out and are fully open, with lots of nooks and crannies, perfect for bird seed and peanut butter.

  2. Once you have your pine cones, start by tying twine to the tip of them. Make sure you leave enough leftover twine to be able to tie your DIY Bird Feeder to a tree branch.

  3. Next, cover the pine cone in peanut butter. Thicker peanut butter will hold onto bird seed better than thinner, creamier varieties. You can either smooth it on with a butter knife, or let your kids get messy and use their hands. Make sure it gets in all the hidden spaces so it can feed a ton of birds. 

  4. Once your pine cone is coated, pour some wild bird seed on a paper plate, then roll your peanut-butter coated pine cone around until it’s fully covered in seeds. 

  5. Now, have your rascal(s) find the perfect place to hang them. Good spots are high enough that cats can’t reach, and not too deep into a tree for a bird to easily get to. Hang them up, and enjoy all the new bird friends that will now be visiting. If your kids get really into bird watching after this project, consider getting them a guide local to your state so they can identify and learn about the different birds that come to visit. 

Written by Head Rascal (Ngoc Nguyen Lay), mother of two rascals, ages 7 and 10.

Easy Halloween Decorations for Kids

How are you decorating for Halloween? I have never been one to be excited about this spooky season, but my kids have changed my tune. I try to make it easy on myself and picked a few items to set the tone without scaring me with the amount of work they require. Below are a few creations we made this season.

Hat Tricks for your Pumpkin

Silly Spooky Door Decoration

Felt Goodies are a Treat not a Trick

If you and your kiddos would like to get into the full decorating spirit, visit Roger’s Garden. We wrote a review of our experience at their Halloween Boutique earlier this month. Shop this post below!

Written by Head Rascal (Ngoc Nguyen Lay), mother of two rascals, ages 7 and 9. Photos by Adrienne Gunde Photography.


Shop The Post

DIY Crayons

DIY Crayons for All Occasions

For party favors, treat bags, and the school art teacher!

My rascals have entered the age of birthday parties (both hosting and attending) and I can’t get enough of this. I adore watching my kids interact with friends, practice their communication skills, and learn social norms naturally. Not to mention they are building confidence and independence. I know there will be a day when I don’t get to attend the parties with my kids and they won’t want me around during their own party. Until then, I’ll bask in this enjoyment.

At a birthday party my youngest rascal recently attended, he received DIY crayons in the favor bag and they were a hit amongst the partygoers. Kids were thrilled to have a multicolored crayon in a fun and unique shape. Parents were excited about it being a useful item and having fewer candy treats in the bag. The crayons were an all-around winner. In fact, my older rascal, who did not attend the party, proclaimed that it was a cool party favor, one he hadn’t seen before, and one he would have wanted.

So, we started experimenting with making crayons at home. We explored mixing colors, various molds, and the oven vs the microwave method. We have given DIY crayons as gifts to art lovers, included them in holiday treat bags at school, and plan to include them in upcoming birthday party favor bags.

The process is fairly straightforward and is suitable for young helpers. We offered our services to the elementary school art teacher and took home her collection of broken crayons.

Step 1

Fill a bowl with crayons.

Step 2

Add warm water and wait 5 minutes for the adhesive to loosen.

Step 3

Remove the paper wrapping and discard.

Step 4

Overfill the molds with crayon pieces and experiment with mixing colors.
(Protect your baking sheet with aluminum foil or parchment paper.)

Step 5

Bake at 250 degrees for 10-15 minutes, turn off the oven, and then let rest for 20 minutes.

Step 6

Let the crayons cool completely, about an hour.

Step 7

Ta-da!

The uses are endless:
- Add to your own home art supply
- Give to a local day care or underserved community
- Add as an “extra” to birthday and holiday gifts
- Include in treat and favor bags
- Stocking stuffers
- Easter egg stuffers
- Anything you can think of!

Written by Brandi Stanton, mom of 2 rascals ages 4 and 6.

For the Love of Birds

Spring has sprung and nature can be seen waking up, stretching wide, and basking in her glory. Where we live in Houston, Texas, this often means tree pollen and allergies (ugh). But, when we can see through our puffy and itchy eyes, there is so much to behold, particularly with our winged friends. In spring, you can hear the birds before you see them, tweeting and singing from different parts of the yard in concert with each other. You can hear the flutter of their wings as they move from one tree to the next. You can even hear their warning calls when a predatory bird enters their turf.

To celebrate and honor the birds this year, my rascals created a DIY bird feeder and a bird perch. Both activities require supplies easily found around the house, only take a few minutes, and can be reused all season long.

SUPPLIES FOR BIRD FEEDER

  • an empty and dry half gallon milk carton (or an empty tissue box)

  • bird seed

  • twine, rope, or ribbon

  • tool to pierce small holes (such as an awl or scissors)

  • cutting tool (scissors or box cutter)

  • paint and paintbrushes (completely optional)

DIRECTIONS FOR BIRD FEEDER

  1. Carefully cut 2 openings in the milk carton (or tissue box) and pierce 2 holes in the top.

  2. Fill the bottom of the bird feeder with bird seed.

  3. Thread the ribbon through the 2 holes in the top.

  4. Hang from a tree. I recommend tying the feeder to the tree as opposed to looping it on a knobby part or branch because the thieving squirrels in my neighborhood pulled the entire bird feeder off the tree and scampered off with it like the nature burglars they are.

SUPPLIES FOR BIRD PERCH

  • narrow box (like a toothpaste box)

  • 2 pencils (or straws, skewers, chopsticks, dowels)

  • twine, rope, or ribbon

  • tool to pierce small holes (such as an awl or scissors)

  • paint and paintbrushes (completely optional)

DIRECTIONS FOR BIRD PERCH

  1. Pierce 4 holes in the lower 1/3 portion of the box. The 2 holes across from each other should roughly be the same distance from the bottom of the box. Stagger the height of the holes so that when the pencils are inserted, they will not hit each other.

  2. Insert the pencils into the holes.

  3. Tape the ribbon to the bottom side of the top flap of the box. Close the flap and tape the flap down so it won’t open up.

  4. Tie the bird perch to a tree.

Happy Springtime! Remember to take a moment each day to smell the flowers, listen to the sweet sounds of nature, and enjoy the feeling of sun on your face.

Written by Brandi Stanton, mother of 2 rascals ages 4 and 6.

Lavender Bath Salts

This recipe for relaxing lavender bath salts is easy to make at home for yourself or to give as a pampering gift. As a mom to two boys, I use this recipe all the time as a great way to unwind after a long day. Not only is this recipe easy to make, but it also smells amazing. The lavender essential oil helps to soothe the skin and promotes relaxation, while the sweet almond oil or olive oil helps to disperse the essential oil evenly in the bath and to moisturize the skin. Epsom salt helps to deliver magnesium to the body through the skin and soothes tired muscles. You’ll feel like you just came from the spa with softer, happier, skin and a calmer, more peaceful mind.

You Will Need

  • Bowl: medium (glass)

  • 2 cups Epsom salt

  • 2 TB. sweet almond oil/olive oil

  • 10 drops lavender essential oil

  • Fresh/dried lavender petals

  • Airtight glass container

To Make:

In a medium glass bowl, add the Epsom salt and sweet almond oil or olive oil, and mix well. Do not use a plastic bowl because the essential oils will absorb into it. Add the lavender essential oil and mix again. Garnish with fresh or dried lavender petals, and store in an airtight glass container.

To Use:

Add the bath salts to a warm bath, and soak for at least 20 minutes to reap the full benefits of the Epsom salts and the lavender essential oil.

Written by Head Rascal (Ngoc Nguyen Lay), mother of two rascals, ages 6 and 9. Photos by Simply Adri Photography.


Shop This Post

DIY Bunny Balloon

I love working on activities with my kids around holidays, but it’s sometimes hard to come up with ideas on my own while I’m juggling my day job, my brands, and being a mom to two little rascals. For times when I’m in a slump, I love hopping on Cottonwood Home’s website to pick something fun for my boys. I know they’ll always have something on theme for the season, and their DIY Bunny Balloon Activity was no exception.

We highly encourage you to purchase the Bunny Balloon Wand Activity Kit from Cottonwood Home. The kits come with everything you need to make these adorable balloons with your rascals.

Materials Needed:

  • 5 inch white balloon

  • Bunny face template

  • Bunny eyes

  • Balloon stick & cup

  • Scissors

  • Glue stick

  • Crepe streamers & yarn

Directions:

  1. Inflate your balloon. Tie it off and attach to the balloon cup by sliding it into one of the slots. Attached the cup to the balloon stick.

  2. Cut the nose, ears, and whiskers.

  3. Using a glue stick, carefully adhere the parts of the bunny’s face onto the balloon.

  4. Tie the ends of the crepe paper together with yarn and attach to the balloon cup.

  5. Take your Spring Bunny with you on all your adventures or invite to a Spring Brunch!

We love mini crafts projects to transition to a new season. This simple craft project is a great spring time activity for your little rascals.

Written by Head Rascal (Ngoc Nguyen Lay), mother of two rascals, ages 6 and 9. Sponsored Post by Cottonwood Home. Photos by Adrienne Gunde Photography.


Shop This Post

Akimiro Collaboration

There’s nothing I love more than when I hear my rascals excitedly say, “Mom! I drew you a picture!” Whenever they give me a new piece of their artwork, I hang it up in my office for a few days, but then I can never seem to find a permanent place for these masterpieces. As a result, I was so grateful to find Akimiro, a small business that creates apparel and other items out of kids’ artwork. I was able to connect with Doris, the face behind the brand, and ask her a bit about how she got started with Akimiro.

Due to the pandemic, Doris found herself leaving her job as a fashion designer to focus on her family and help her toddlers navigate the virtual world as their “homeschool teacher.” Even though she decided to stay home to help her children, they ended up helping her just as much and inspired her to start a business. After smiling over countless works of art from her kids, she realized that she must not be the only one fascinated by children’s art and decided to start Akimiro, a brand that celebrates children’s creativity and expression.

One really unique thing about Akimiro is their Little Artists Collection. This collection allows children to submit their artwork to Akimiro and displays their name, age, and where they’re from alongside the artwork they created. Their artwork is featured on a ton of different products, from shirts and hoodies to fanny packs and mugs! The inspiration behind this collection is Doris’ idea that children are all born artists, so she challenges herself to work with the art children create and turn it into a unique graphic that any adult (or kid!) would wear and use, contrary to the popular idea that only parents or grandparents enjoy children’s art.

Another unique feature Akimiro offers is their ‘Create Your Own’ option, where anyone can design a custom piece with their rascals’ artwork. Not only does this give a permanent home to the art that kids love to create, but it also encourages kids to continue to explore their creativity. My rascals love their new hoodies with their special artwork. I love my mug, it was a reminder for me to take each day slowly and have a bit of art fun with my kids.

Be sure to check out the Little Artists Collection and support the little artists Akimiro has worked with so far, and stay tuned for new ones! Akimiro introduces new artists and artwork monthly.

Written by Head Rascal (Ngoc Nguyen Lay), mother of two rascals, ages 6 and 9. Sponsored Post by Doris of Akimoro. Photos by Simply Adri Photography.


Shop This Post

DIY Jammie Quilt

My favorite piece of baby clothing is hands down pajamas. Warm jammies and summer jammies. Themed jammies and holiday jammies. I just can’t get enough! But, what do you do when your rascal has outgrown their jammies? Well, you could save it for the next baby, or put them in a box in the basement, or you can relive each precious night by creating a Jammie Quilt! Supplies are minimal and make for a great keepsake for any rascal, big or small!

What you’ll need:

  • 25 Jammies/Onesies/etc.

  • 1.5 yards of soft backing fabric, like Minky!

  • Batting (crib size)

  • Double-stick sewing tape (the kind that washes away is amazing!)

  • Thread

  • Yarn

  • Sewing Machine

  • Scissors

Step 1.

Wash, dry, and iron all fabric.

Step 2.

Cut the jammies/onesies into 10”h x 7.5” wide rectangles. The more precise and accurate your cuts, the easier time you’ll have when stitching everything together!

Step 3.

Lay out the 25 rectangles in a pattern that you like! They should be in a 5x5 pattern (5 rows of 5).

Step 4.

Starting with the first row, stitch pieces together using a 1/4” seam allowance to create strips that run horizontally. Do this with all 5 rows.

Step 5.

Pin the top row to the second row, making sure all seams are aligned. Stitch rows 1 and 2 together using a 1/4” seam allowance. Continue by pinning and stitching together rows 3, 4, & 5 until all the rows are stitched together, making one big sheet of jammies! Turn the sheet over and iron flat all seams.

Step 6.

On a flat surface, lay down your cotton batting, making sure to smooth out any wrinkles/bunching. On top of the batting, you will need to lay your backing fabric (i.e. Minky) FACE UP. On top of the backing fabric. you will lay the jammie fabric FACE DOWN.

By this point you should have a fabric sandwich: batting, backing, and jammies.

Use the double-sided tape to tape the batting to the back piece, and the back piece to the Jammie piece. Running the tape around the edges works best. You can also pin the pieces together, but with little ones running (or crawling!) around, I wouldn’t want to risk a stray pin falling out!

Step 7.

Once your fabric is taped (or pinned!) together, stitch all the way around the blanket using a 1/4” seam allowance. Be sure to leave a 6-7 inch gap, so that you can turn the blanket inside out.

Step 8.

After all edges have been sewn down, leaving the gap, go around the edges and trim off any excess. This will make a tight edge.

Step 9.

Turn the blanket inside out. Use an iron to iron down all the edges so they are as flat and neat as possible.

Step 10.

Run the blanket edges through the sewing machine one more time, using a 1/4” top stitch. This will give the blanket a finished edge.

Step 11.

Use knitting yarn and thick needle to insert “ties” in a few spaces in the blanket. This will insure that the batting doesn’t shift when being cuddled!

Step 12.

Throw into the wash to get rid of the double-sided tape.

Step 13.

Ta-da! You’re done! You have a jammie quilt that you and your rascal can cuddle under for many years to come!

Shared by Crystal Zeyen, mother of 1 rascal, age 3.

Rose Float Decorating with Kids

Besides my world here with Hello Rascal Kids and Skybox Events, I work on a college campus where I am lucky enough to meet countless talented, innovative, and inspiring students. One of the students with whom I’ve worked closely was the design chair for Cal Poly Pomona’s Rose Float in December of 2019 and they were able to give my family and friends a tour. As a kid, I used to watch the Tournament of Roses Parade every year and was always in awe of all of the beautiful floats. I wanted to be involved in it in some way, but I never had these connections before. During the tour with my student, my boys and a few of our friends had a blast seeing the ins and outs of making the rose float and helping with some of the decorations. 

Aquatic Aspirations.jpg

Volunteering with the Cal Poly Rose Float Lab helped my kids and I truly see that the floats aren’t just pretty to look at – they’re engineered and are actually drivable. Every aspect of these floats embody the Cal Poly Universities’ hands-on atmosphere, and the 2020 float was no different. The float is a collaboration between Cal Poly Pomona and Cal Poly San Luis Obispo, with students working on it year-round. Their rose float is the only float that is entirely student-built, from the design idea and construction right up to troubleshooting and driving on the day of the event. Even though the float is student-built, they are held to the same standard as professional float builders in the annual Tournament of Roses. Despite being student-built, the Cal Poly Rose Float has won sixty awards and trophies in the seventy-two years that they have participated in the competition! They were also the first float to use hydraulics for animation, computer-controlled animation, fiber optics, animated decorations, and color-changing floral effects.

The theme for the Cal Poly’s 2020 Rose Parade float was “Aquatic Inspirations,” drawing from the idea that hope is a powerful guide, no matter what you want to achieve. Students working on the float took trips to the Aquarium of the Pacific in Long Beach, CA and local pet stores to help them develop the idea to utilize “kelp forests'' to hide the structural support of the submarine, which was suspended thirty feet above the ground. The structure was hidden by 629 hand-made kelp leaves that my boys were able to help make. By the time the float was on the road, my boys and the rest of the volunteers had cut enough leaves to cover two inches of the float! Cal Poly uses all natural products to decorate the float, including sliced citrus, lentils, and even ground coffee. The students got creative with the decor, using popcorn kernels and walnut shells to create the look of a sandy sea floor. When it was all ready to go, approximately 30,000 flowers covered the float. The CPP Rose Float will be returning safely this year, but we are still checking if we can volunteer again this winter.

Volunteering with my kids and getting a tour of what goes into the float’s creation from start to finish was a really great experience, especially looking back at it now. We went with our friends, which made the experience even more special. We were involved in the building of something huge, in a small way, and we did it with a crowd of people that seems so much larger now in a post-pandemic world.

IMG_4050.JPG

Being a part of the float helped my kids and I have a better understanding of how something is created with the help of a community. They were able to have a unique connection to the float when they saw it on New Year’s Day. The feeling of contributing to something bigger than themselves and being a part of a community is such a wonderful lesson to have as a kid. We’re hopeful that we may be able to participate again this year or another year in the near future as we reflect on the experience we had for the 2020 Cal Poly Rose Float.

Written by Head Rascal (Ngoc Nguyen Lay), mother of two rascals, ages 6 and 8. (Ages during volunteering 4 and 6)

Becoming Community Minded

A question I ask myself often is: How do I teach my kids that we live in a world greater than ourselves?

It seems like the answer would be obvious. It seems like they should get it intuitively. And maybe they will as they get older. Or maybe they need real life experience.

As their mother, I am called to bring to light the greatness of our community, both in terms of the number of people who live in it and the things we can accomplish as individuals and in groups. I want my boys to know that they have gifts to give: compassion, smiles, hugs, respect, and help. I want my boys to understand that our community is only as strong as we make it. I want my boys to feel the power of helping others and raising each other up.

At the start of the COVID pandemic in 2020, my boys made cards and drew pictures for members of our community (see original blog post) who couldn’t receive any visitors. My boys were worried about how lonely they may be without seeing family and friends. They wanted to do something for them; so they made cards, letters, and pictures that we mailed to various assisted living centers throughout the country. And, residents wrote back, thanking the boys for sending smiles and laughter through the mail.

Recently, we’ve had conversations about the scarcity of (and in some communities the abundance of) food. In our house, food is not something we have to worry about. Open the cupboard. Open the drawer. Open the refrigerator. We can shop at the grocery store, the farmers markets, and the mobile grocery store that visits our neighborhood a few times a week. In other homes, cupboards are empty. Shelves are bare. Refrigerators have nothing. That is a reality we are fortunate to not understand firsthand, but it is a reality for members of our community.

Kids’ Meals is a Houston-based non-profit that delivers food to young kids who are not of age to benefit from the school-based free meal programs. The food for these kids are packed into brown paper bags and delivered by volunteers. To bring a little light and happiness with each bag, my kids decorated nearly 5 dozen brown paper bags with stickers, illustrations, activities, and games.

Becoming Community Minded on Hello Rascal Kids

I’ve never seen my kids so excited to create something for someone else. They may not yet fully understand that kids their age do not always have food in their tummies. They may not yet fully understand that kids their age go hours without a meal. They may not fully understand that food insecurity has many negative impacts on a child’s development. However, they are beginning to understand that other people’s lives are not like ours and we have the ability to help in big and small ways.

May their hearts grow big as their love for others spread wide.

Written by Brandi Stanton, mom to two rascals ages 3 and 5.

Boba Learning Kit

1E5A7455.jpg


Anyone who knows me knows that I am a boba fanatic. I love all things boba (so much so that I constantly set goals for myself to reduce the amount of boba I consume…which never last very long) so I was super excited to find R is for Rooster’s boba themed learning kit. With this kit, I can share my love for boba with my boys while helping them learn in a new way. 

1E5A7155.jpg

R is for Rooster’s Etsy storefront has a wide variety of cute, minimalist educational activities for kids. Of course, the boba learning kit is what caught my eye immediately. After my boys and I played around with the kit, including writing our boba barista name tags and counting colorful boba pom-poms, I was able to learn a little more about Nancy Diep, the mom behind R is for Rooster. Nancy shared with us the story behind her storefront:

“My inspiration for R is for Rooster came from my two kids. Being a stay-at-home mom, I noticed that hands-on activities were the best and most effective way to teach my kids while holding their interest the longest. This makes learning (and teaching) more fun, but also helps me manage their attention span. Since my kids are both toddlers, it is extremely difficult to hold their attention for very long unless we’re doing something fun and exciting together. I decided, since hands-in activities helped me with my kids so much, why not extend the fun to other moms and children?

From here, I started R is for Rooster. As a creative small business owner, the initial idea was the easy part – everything seemed uphill from there! The challenge of running a small business is competing with so many others who are creating and selling the same type of product. I constantly have to think of new and creative ideas while balancing two toddlers at home. Most of my work gets done after they finally go to bed!  

Having my own small business does have its perks – I can work at my own pace, on my own time, without having to get an approval from anyone else on my design choices. Being my own boss for R is for Rooster has been the perfect outlet for my creativity and allows me to design freely. With my background in design, freedom to create is very important to me. 

Before R is for Rooster, I used to be a clothing designer. I designed junior girls’ denim for about 8 years. I left my career when I gave birth to my first child, but my creativity came with me! I thought it would be a temporary break, but, after having my second baby, I knew I wasn't going back to my design job. The knowledge that I wouldn’t be designing clothing again made me sad because I loved it so much. Having so much of my creativity bottled up with nowhere to go was a horrible feeling. I needed a creative outlet and, as I began to create new ideas for teaching my children, I thought designing fun learning materials was the perfect use of my graphic design skills.

I realized that leaving my design job didn’t have to mean I was leaving being a designer. Just like designing a clothing collection, I learned that I could create my own style within my brand, finding my niche in minimalist, fun colors. I really enjoy that I can design learning kits with a theme or concept in the same way I used to for clothing. For my first few designs for R is for Rooster, I used food as my theme. I started off by making alphabet and number posters that could be hung in and used for a play kitchen; these posters were both visual and interactive.

From that idea, I came up with an ice cream shop concept and, from there, a bakery concept. I then wanted to create something hands-on to teach counting and thought boba was the perfect idea! I started to design the cards and tracing sheets and then found small brown pom-poms for boba, which worked out perfectly! I tested the kit with my kids, and they loved it. 

I am still creating and thinking up new ideas every single day, which is what I love most about my job. Right now, we are working on adding more digital downloads to our shop. We’re hoping to include learning materials as well as minimalist décor, such as posters for the nursery or bedroom or even printable holiday items. I’m excited to continue to create for my shop, my kids, and my customers.”

Shared by Nancy Diep of R is for Rooster. Photos by Simply Adri Photography.

Mother's Day Creative Kit

Creativity was the driving force behind starting Hello Rascal Kids – I was overflowing with ideas that had nowhere to go until they found their home here. From there, our mission grew to showcase, foster, and build different outlets for creative expression and imagination.

Our goal closely mirrors that of Cottonwood Home, which is why we are so ecstatic to announce our first creative kit collaboration with them!

Creativity has many benefits, the most important one being that it's FUN and allows us to enter our happy zone. Take a brain break with our Creativity Kits that are designed by teachers to stimulate imagination, innovation, and, of course, creativity. Most of the activities and recipes can be done again and again so the fun doesn’t stop after the first try. In no time, you'll learn that repeating activities helps build confidence and independence for your rascals.

Our first collaboration will help make any Mom's day. Let her know just how special she really is with our 6-in-1 craft kit that's easy for kids of any age to create and have fun with! Meaningful gifts are all about time, thoughtfulness, and tapping into your creativity and we're certain any mother figure in your life will absolutely adore these unique gifts crafted by her favorite people!

Each activity comes individually wrapped with step-by-step directions and a video tutorial to guide the way!

The 'Handmade Happy' Kit - v.1

  • paper maché frames - includes wooden frame, tissue paper, mod podge, paint brush

  • make your own book - includes paper bag book, page inserts

  • burlap embroidery - includes burlap, assorted yarn, plastic needle

  • easy peasy pop tarts - includes confetti sprinkles

  • apple yogurt donuts - includes freeze dried strawberries

  • grilled cheese hearts - includes heart cookie cutter

Discount Code for 10%: hellorascalkids10

Price: $28 single and $38 double child kit with FREE SHIPPING

Need more materials for more fun (or a sibling, friend, or other loved one)? Select "double" for double* the quantity!  Suitable for ages 4+ 

These would be the perfect gift to send to a friend or family with kids. Let us know if you'd like to include a message in the personalization box! 

Written by Head Rascal (Ngoc Nguyen Lay), mother of two rascals, ages 6 and 8. Collaboration with Cottonwood Home. Photos by Simply Adri Photography.


Shop This Post

Super Messy Art

Recently, a teacher friend suggested I try shaving cream and food coloring as an art activity with my rascals. That sounded easy, so I gave it a go without much preparation or thought.

I had no idea what I was getting into. The mess. The stained hands. The squeals of laughter. The beautiful finished products hanging on the wall.

Yes, in hindsight, I won’t do this art activity again without more preparation, but also, YES, we will be doing it again! My rascals loved every moment of this activity - touching the shaving cream, choosing their food coloring, and mixing the food coloring to create new colors, tints, and shades. This activity is fun and educational, a double win in my book.

20200416_155814.jpg

The basic supplies needed are:

  • White shaving cream (not gel)

  • Food coloring

  • Canvas, cardstock, or something equally sturdy

  • Mixing tools (straws, cotton swabs, cotton balls, paintbrushes)

The process is easy. Dispense the shaving cream. Add food coloring. Mix.

Despite my best efforts to get my rascals to use the straws, they could not resist the feel of the shaving cream between their fingers. So, I gave up on that battle and I enjoyed their excitement with this sensory activity.

Next time, though, I will do things a bit differently. Here are some tips if you are interested in experimenting with this activity:

  • Keep a bucket of water nearby instead of risking little fingers touching furniture and walls on the way to the bathroom

  • Put the shaving cream into a bowl and provide paintbrushes so it is more like “painting” rather than “fingerpainting”

  • Cover the table with newspaper or a drop cloth

  • Take their clothes off or have them wear smocks/old t-shirts!!!

And a word to the wise: it is advisable to wipe down the finished product with a paper towel because the globs of shaving cream don’t really ever solidify.

20200416_162115.jpg

Happy messy art activity!

Written by: Brandi Stanton, mama of two rascals ages 2 and 4.

Paint Your Own Pottery - At Home!

I grew up in a small community in Los Angeles and I have fond memories of my grandparents taking me, my sister, and my two cousins to the local pottery store every week. This was a mom and pop shop that sold ceramic items that you could take home to paint. I am by no means artistically talented; even using the word creative is a bit of a stretch. Yet, I remember these painting experiences with joy and I can recall the pride I felt when my finished piece held a place of honor on the fireplace mantle.

Over the years, “paint your own” pottery shops have popped up across the country and they are a special venue for weekend family outings, guided art classes, homeschool curriculums, and birthday parties. The local shop in Houston, called The Mad Potter, has graciously (and very strategically) changed their business model due to the current stay-at-home climate. You can opt to paint in the studio like usual, or you can select your items online and have them dropped off at your doorstep with contact free delivery! This has enabled my rascals to paint pottery in the safety of our home without me having to own my own pottery tools, utensils, and paints. Woohoo!

In less than 24 hours of online ordering, the following items were at my doorstep, safely wrapped and secured. The amount of paint supplied easily surpassed our needs.

Paint Your Own Pottery at Home on Hello Rascal Kids.

My rascals wasted no time getting started. The studio provided a card with instructions and recommendations for how to paint your pottery at home. One major plus is that the paints provided are water-based, non-toxic, and free from allergens. That was one big sigh of relief for this mama.

The final step does include some contact at the shop, but it is quick and masks are required. In less than 5 minutes, I masked up, took the finished products to the studio, and dropped them off to be fired. It took me 5 minutes (instead of 2) because I bought square plates for the boys to paint with our extra supplies! I’m hooked.

Three days later, I swung by the studio for a contact free pick up of the final products. Amazing!

Written by Brandi Stanton, mama of 2 rascals, ages 2 and 4.

How to Make an Envelope

The act of sending letters is something we practice often in our home. It is National Letter Writing Day on December 7th, and we want to share how our rascals learned to make their own envelope to send out their letters. With the holiday season here, sending letters is a great way for us to connect with family and friends. Of course, the boys will also be busy writing to Santa Claus and hoping their envelopes will make it to the North Pole safely.

Here is a guide on How to Make an Envelope with your rascals. It’s something you can do for your holiday letters or just for everyday fun. You can make extras to have on hand or you can make one for each occasion. The graphic below gives you all the details.

Written by Ngoc Nguyen Lay, Head Rascal. Mother of two rascals, ages 5 and 7. Sponsored post by Quill.

Fall Leaves Tracing Activity

As we continue to live a majority our lives online, we’ve been looking for more ways to take our family time outdoors. Brainstorming new outdoor activities for my boys always starts with me reflecting on my own childhood memories for inspiration. With the beginning signs of fall starting to show, I can’t help but think of all the fall activities I loved as a kid. My favorite one, year after year, was tracing all the different colored leaves I could find.

Fall Leaves Tracing Activity on Hello Rascal Kids. Lifestyle blog for the modern parent, kids and families.

All I needed to recreate the leaves I spent my afternoons collecting was a piece of parchment paper and a pencil. As an adult, I understand the leaf rubbing process, but as a child, I was fascinated watching my drawing appear almost like magic.

I wanted to share this simple, fun activity because it really is so much more than it appears. Not only is it a fun art project to do with your kids, but it also sets the scene for you to teach them about the signs of changing seasons. It’s an art and science lesson wrapped into one!

All you’ll need is some paper and a writing instrument. You can get creative with the tools you use! For paper, you can choose from parchment paper, tracing paper, or wax paper. For writing, you can use colored pencils, crayons, or a regular pencil.

Steps:

  1. Have your kids explore their yard or their neighborhood and collect leaves

  2. Once you have your leaves, gather your art supplies

  3. This step isn’t necessary, but, for stability, you can tape the leaves to your drawing space, so they won’t move around as much

  4. Place your leaf in the center of your writing space and cover it with your paper of choice

  5. Slowly rub your writing tool over the top of the paper and watch the tracing of the leaf appear!

Feel free to mix and match your paper types and writing tools. This activity can also be repeated multiple times so your kids can see the different colors the leaves change into throughout the stages of fall. If you want to take the educational aspect of this activity further, here are a few book recommendations to get your kids thinking about the science behind the seasons and recognizing other signs of fall:

Written by Ngoc Nguyen Lay, Head Rascal. Mother of two rascals, ages 5 and 7.

Obstacle Course for Outdoor Fun

Obstacle Course for Outdoor Fun on Hello Rascal Kids

Sidewalk chalk is an all-time favorite item in our household. We love drawing with the chalk, writing our names, playing games, and even creating illustrations on our wooden fence. Both of my rascals learned to spell and then write their names using sidewalk chalk.

A recent favorite use of our sidewalk chalk has been to create obstacle courses in the driveway. The rascals love it! The obstacle course changes each time, requiring them to practice new gross motor skills, coordination and balance, and even their academic skills. They assist in the design and creation, which helps because it can take time to get everything mapped out and illustrated on the concrete. The payoff is great, though - I can often sneak away to indulge in a chocolate treat while they are busy!

The obstacle course can include just about anything. We love to focus on gross motor skills and age-appropriate academics. This can include:

  • Crawling

  • Running

  • Jumping

  • Skipping

  • Galloping

  • Lifting

  • Throwing

  • Hopping

  • Shapes

  • Letters

  • Spelling

  • Patterns

  • Numbers

  • Alphabet

One of the best parts of the obstacle course is that you can make it whatever you want or need it to be, based on the age and development level of your rascal(s). Below is an example of our latest creation.

Sidewalk Chalk Obstacle Course.jpg

We almost always celebrate the end of the obstacle course with a roar, but you can choose to end it any way you want or even make it a continuous loop.

I keep the academic components alive by asking questions of my rascals along the way. “What shape is that?” or “What did you just spell?” or “How did you know to do that?” I’m getting them to verbalize their understanding and processing so I can comprehend where they are intellectually.

There are tons of sidewalk chalks available, but our favorite are ones that have bright colors and if they have glitter - even better! Try these or these.

Written by Brandi Stanton, mama to two rascals, ages 2 and 4.


Shop The Post

Creating an Inclusive Home

Creating an Inclusive Home on Hello Rascal Kids.

Children today are in a completely different space than we were as kids. Our generation was raised with the biases and limitations our parents’ experiences imposed on us. I was raised from the perspective of immigrant parents who had never heard of social justice, much less knew how to instill it into me. Still, our generation grew into strong advocates for our beliefs. 

Can you imagine the power our children will have? They are being molded by dialogue and resources that many of us did not experience at a young age. This social justice movement is bigger than any I have ever seen and has so much potential, more so than many in our past. Because of the influence of this movement, our children have the opportunity to grow into passionate leaders and change-makers. It is our responsibility as parents to nourish the sparks of social justice in our children so they can become the light this generation has the power to be. 

I am in a privileged position where I have done years of training on inclusion and diversity. In juggling my different roles – mother, business owner, and friend, among others – I have learned that you cannot force your own level of competency on someone else, especially if they are just starting their journey. As a parent, it is important to facilitate conversations around justice and equity, but we need to understand how to do so differently for our children than we would for ourselves or others. What I do in my job and my business are worlds different than what I do for my kids, so I have to find a different way to engage that works for them. 

One of the best starting points for implementing changes in your family is to figure out your (and your children’s) current level of understanding. Where you are at in your life and in your journey will help dictate how you’re going to teach your kids. There is no all-encompassing “this is what you do” handbook for teaching social justice. My personal belief is that as long as you’re learning, you are getting closer. And as long as you’re open to learning, you’ll get to where you need to be. It’s a lifelong learning process when approaching social justice understanding for yourself and your kids.

Another important thing to understand is your children’s current level of understanding when it comes to complex topics and situations. We need to recognize our kid’s age when we talk about what is going on in the world or in the news. The week that George Floyd was killed, my husband and I knew that AJ (age 7) would have questions and that Ben (age 5) may not. I shared with my children that George Floyd is dead. Depending on where your children are at, it is okay to not feel comfortable with this. It might be too much for your children if they don’t understand the concept of death. I always try to use factual statements with my children so, at the very least, they know what is happening, even if they don’t fully comprehend it.

Be ready for your children to ask questions, and for them to be at a level of empathy that you may not have expected. Expect them to have questions that you may have never even considered. Your kids may want to know details about death and dying that you don’t have the answers to, and it’s okay to admit this to them.

The evening we spoke about George Floyd with AJ, he told us he couldn’t sleep because he was thinking about George Floyd and his family. He needed more explaining than Ben did because he is at an age where he wants to know more and feels empathy for others. Ben is younger, so he isn’t old enough to really have any questions or thoughts on the situation; he just knows something sad happened. 

When talking to your children, understand that learning is a process. We are still having these discussions as new information is available, but we are also bringing up topics in small bits because children get overwhelmed easily. For my family, I gauge how much or how little to share based on what questions AJ asks. Some kids may ask deeper questions, but, for AJ, a lot of concepts and ideas aren’t there yet. The concept of a trial is over his head, so, if we try to start there, he gets lost in the details of our judicial system, and that takes away from our message. In talking to Ben, we have to understand where he is at in his understanding and discuss these topics differently than we do with AJ.

As parents, we also have the ability to challenge biases imposed on our children by others. We are in a position to reinforce the ideas we want our kids to consider and understand. In the summer, Ben and AJ’s relatives often ask questions like, “Why is your kid so dark? Why did you ‘let them’ get so dark?” I can’t sit there and lecture my friends or family. They have lived with these biases that are deeply ingrained, and I may never be able to change their attitudes. I can, however, reaffirm the views and beliefs we uphold in our household in a way that doesn’t negatively impact Ben and AJ. I reaffirm to our children the idea of acceptance, and that their skin is beautiful.

Of course, we are not doing every single thing in our house all at once. We are changing things little by little. We shared books about diversity with our children and let them choose which ones to read. We also talk to our kids about current events, answer their questions, and check in with them to honor their feelings. 

The main thing I wanted to convey is that there is no one-size-fits-all solution to social justice. See what works for your family and know that it is okay to find things that don’t. We are all still trying to figure it out, no matter where we are in our learning process. We all have a role to play. Some things may change, and some may not. There may be big changes, but there will be even more small changes. Know that progress is progress. 

This is a special time in our history. We can’t waste it.

Written by Head Rascal (Ngoc Nguyen Lay), mother of two rascals, ages 5 and 7.